Pipeline steps
Read file
The Read file step of the coupling pipeline allows the parsing of values from text files. It loads the desired file and applies the set of user-defined rules to extract values to be assigned to variables. It is an essential part of the Coupling pipeline in all cases where parsing results directly from the standard output of an Executable is not possible.
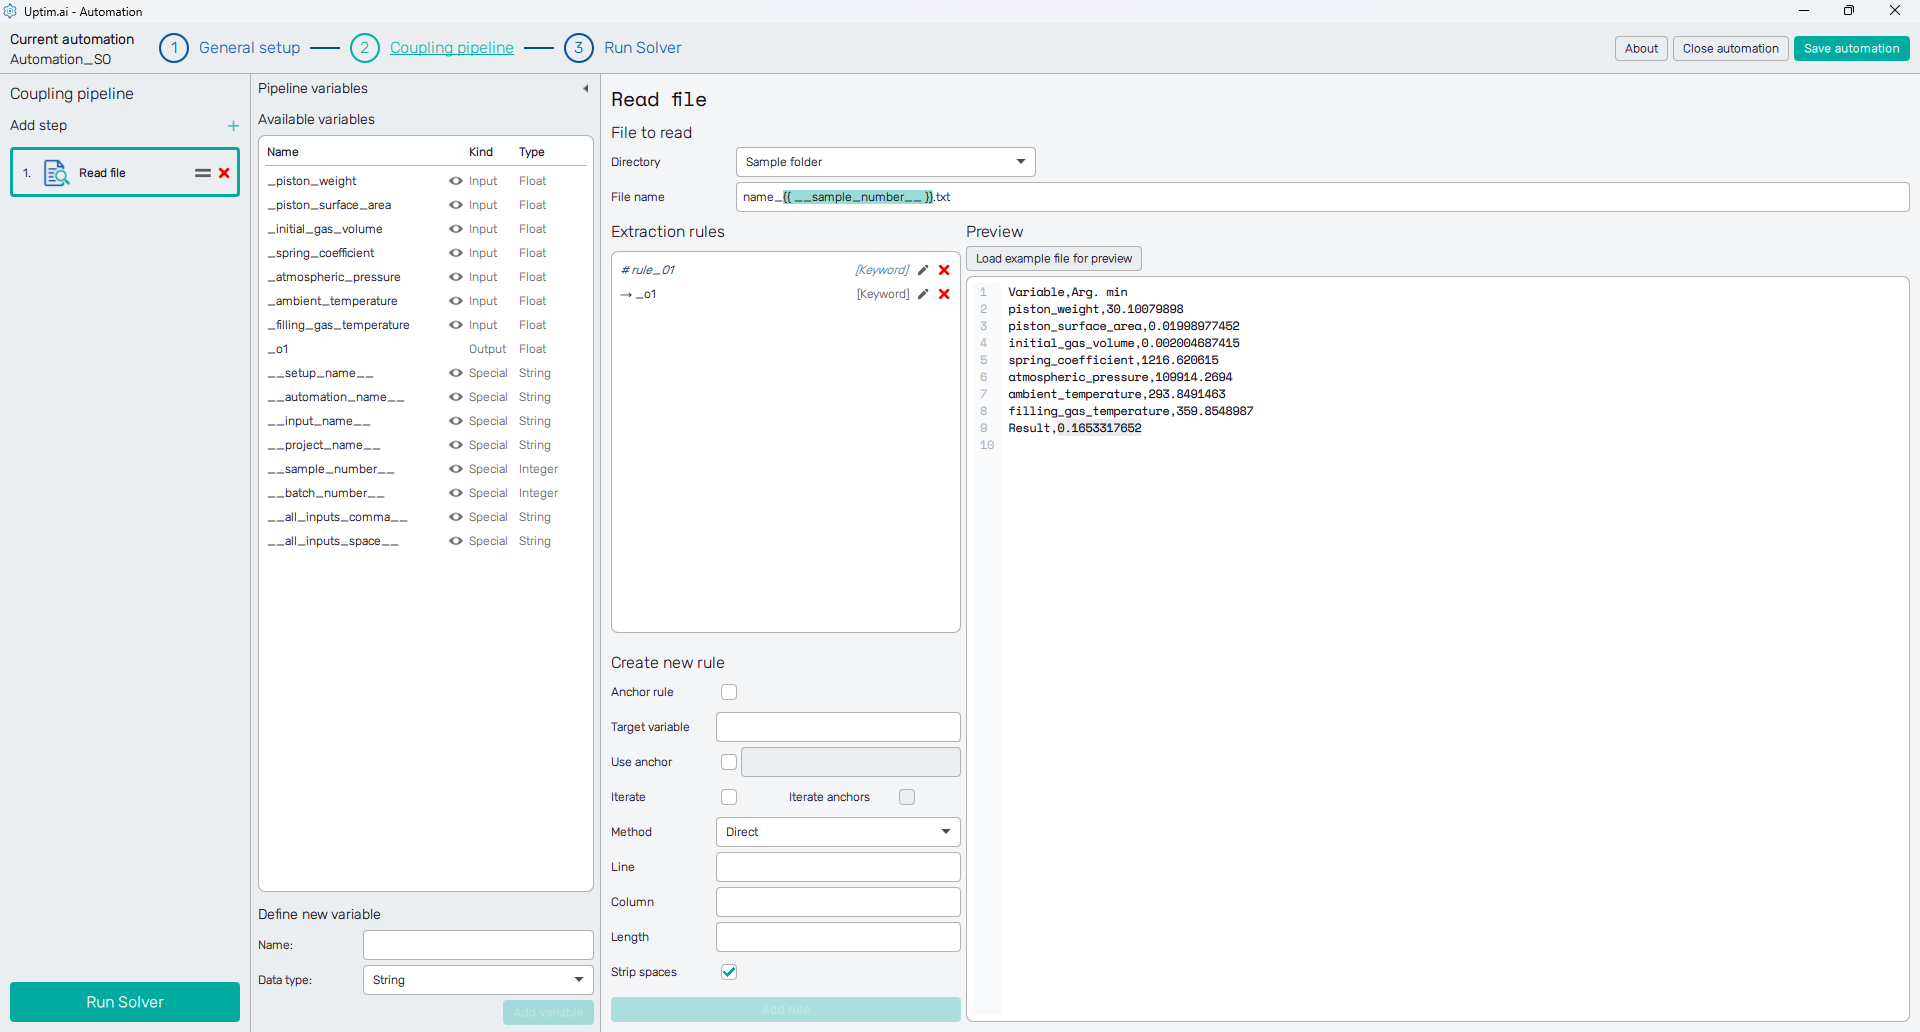
The first task is to define the Directory where the file will be searched for. The Sample folder option is available only if the switch Isolate coupling files is on in the General setup of the automation session. Also, besides this and the Project folder, there is also the Custom directory with an entry field dedicated to its path that appears once this option is selected. Then, users can browse the file explorer to locate the directory.
As valid for all entry fields in the Coupling pipeline screen, the File name entry accepts formatted variable names to enable dynamic file name changes during the pipeline run.
Manage extraction rules
The right part of the screen serves as a notepad, which can show an example or a preview of a file, just like the one that is about to be used in the pipeline. Any plain text file can be selected via the Load example file for preview button. The status line above the top right corner of the field shows the exact cursor position in the text to make the orientation in the file easier for the definition of extraction rules. Also, the text selected based on existing extraction rules is highlighted as a tool for debugging the extraction rules.
Extraction rules are listed and defined in the panel under the file path definition. Hovering over each rule item shows a summary pop-up, and also the text found based on this rule is highlighted in the preview area to the right. Rules can be updated via the 🖊 icon (or by double-clicking the rule item) or removed with the corresponding x symbol.
Create new rule
The section under the list of extraction rules holds the controls of the new rule definition. The Anchor rule switch decides if the rule serves to store values to a variable or if it is about to be an anchor, splitting the text. Based on the switch, the user defines either a unique Anchor ID or the Target variable (e.g. one of the output variables, the name has to match one of the existing variables from the list of Available variables).
Existing rules can be used as anchors in the new rule definition. Everything before the used anchor gets ignored from the perspective of the currently defined rule, considering the anchor to be the beginning of the search. The search through the file is stopped when the text matching the rule is found. Moreover, the anchor, as well as the rule itself, can be iterated to search for the last instance of the rule in the file. Clicking the Add rule button confirms the settings and adds the rule to the list.
Three basic methods are available for extraction rules:
- Direct : Defines the position of the searched value from the beginning of the file (or from the anchor) with the Column and Line number. Users also set the exact Length of the extracted text field. Eventual blank spaces can be removed from the sides of the extracted text if the Strip spaces switch is on. The rule is well suited for files with rigid and exactly defined formatting, such as result files of traditional FEM codes.
- Keyword : Searches for a particular word in the file content. Then, it extracts the text following the keyword up to the end of the line, unless the First word only option is activated.
- Regex : The rule searches for the value matching the regular expression. Note that only the content of a capture group is extracted and used as an anchor or saved to the target variable.
Online AI chatbots are quite efficient helpers for the definition of Regex extraction rules. Moreover, websites such as regex101.com explain the meaning of regular expressions in detail and provide debugging.
Updating the rules uses the same controls as the rules’ definition, only the change of the searching method is not allowed. Changes are confirmed by clicking the Update rule button or aborted with the Cancel button.
Write file
The purpose of the Write file step is to create text files based on a user-specified template. That is useful e.g. for creating input files for external software, which is then executed using the Executable step. Those can be for example the definition files used by FEM solvers, where e.g. the materials properties can be set dynamically.
Similarly to the Read file automation step, the user has to define the Target file directory where the created file will be stored later and the Target file name. The Sample folder option is available only if the Isolate coupling files switch is on in the General setup of the automation session. Also, besides this and the Project folder, there is also the Custom directory with an entry field dedicated to its path that appears once this option is selected. Then, users can browse the file explorer to locate the directory. Then, the user needs to specify
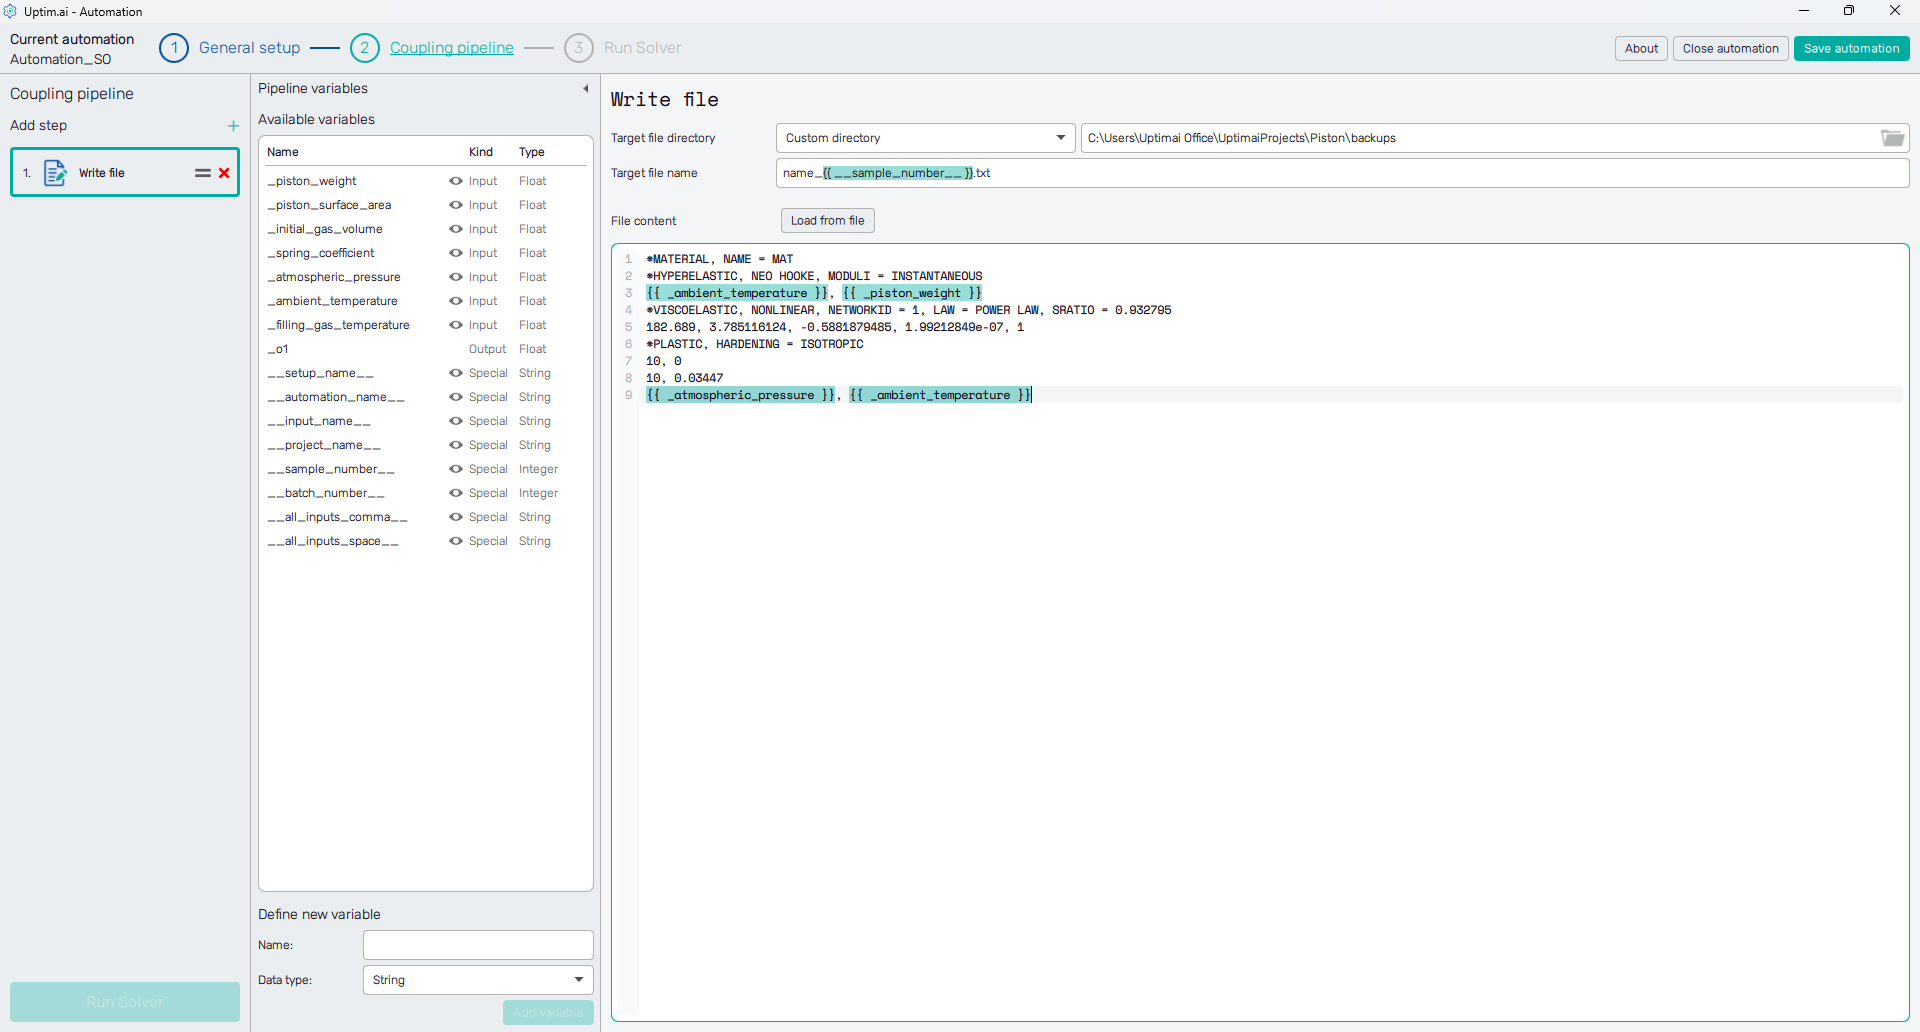
Below the section with the target file definition, there is a notepad area where the content of
the file is handled. The desired contents of the created file can be either written manually, or another file can be
loaded and used as a starting point, using the Load from file button. To insert dynamic values into the file
(e.g. the input variables), the {{ <variable_name> }} structure is used, as shown on Figure 2. This
structure will then be replaced with the actual value of the used variable, when the coupling pipeline is running.
In certain cases, very strict formatting of values in files is required to be accepted later by external software. It is typically the length of a field and the number of decimals. Therefore, a format specifier can be added to the variable name (divided by a vertical bar) to prescribe the value formatting. You can use this document as a reference for the format specification.
As an example, let's assume the value of the input_parameter_1 should be eight characters long
in total, including two decimals, and prefixed with the string "value = ". It will be defined in the notepad as:
value = {{ input_parameter | %8.2f }}. In case the actual value of the input_parameter variable is pi, the result
string will be value = 3.14
Executable
Currently, the Executable coupling pipeline step can run either an independent external program or a Python script. It creates the required command for the system terminal, executes it, and retrieves its status and standard output and error messages.
Command options
First of all, the executable type has to be selected as either a Generic executable file or a Python script. The location of the file or script to be executed is defined with the Executable path, which again can lead to the Sample folder (in case the Isolate coupling files option is enabled in the General setup of the automation session), the Project folder, or the user-defined Custom directory.

Arguments/options to be passed to the executable are set in the entry field, also accepting formatted variable names. As already explained, these are later replaced with the true values of variables. Here in the presented figure is an example of using the special variable that parses all input variables as whitespace-separated values.
Situations where the executable requires user input from the console are automatable, too. Users can set either a Direct value or set up a link to a file with a batch of responses. Each line of such a file counts as one input entry.
Very important is the Working directory from which the executable is being called. This is important, especially from the point of view of files available for the executable’s run and files the executable is storing (and need to be processed or manipulated later).
Output handling
The pipeline can process the standard output and standard error generated by the executable. It is possible to assign these directly to output variables. According to the setup, the program expects the values to be comma-separated, whitespace-separated, or to match the user-defined regular expression (regex). Selecting the regex option from the drop-down menu shows an entry field for the regex definition. Be aware that only values from defined regex capture groups will be stored. This is the most common method for retrieving output variables, particularly when using Python scripts.
When parsing multiple values in one executable step, the program assigns found values to output variables in sequential order. E.g. the executable gives two outputs, thus, the program assigns extracted values to the first two output variables that are not known at the moment. In case the program parsed more values than the number of undefined output variables, these surplus values will be discarded.
When directly parsing stdout or stderr values, make sure the executable is providing these. If e.g. parsing of stderr value is on and the executable does not produce one, the pipeline step of the executable will fail.
Another possibility is to save stdout or stderr to a file. Then, the user has to define the Directory and the File name where parsed values will be saved. This option of output handling can be used either when the executable generates more complex outputs (not just values that can be directly used for output variables), or in cases where executable outputs should be loaded into user-defined variables. Parsing of values to variables will be done in the following Read file step.
Special options
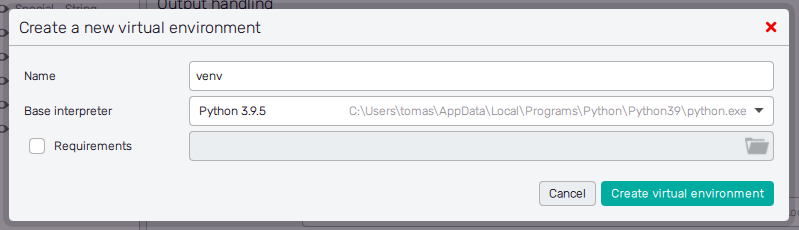
At the moment, there are special options available only for Python scripts. Users can select the Python interpreter from the list of Python installations found in the system. Also, it is possible to open the file explorer with the Add existing button and locate any other existing Python instance present on the computer. Interpreter options will be used while invoking Python. Their use and list are described in detail in the Python documentation.
Ultimately, the Create a new virtual environment button opens a pop-up window where users can create a new virtual environment from the already existing one. Specify the Name for the new virtual environment and choose a Base interpreter from the list of detected or previously created Python interpreters. The Requirements switch lets the user select a file that lists the packages to be installed in the environment (in the standardized pip requirements format). The Create a new virtual environment button confirms the setup and creates the environments, the Cancel button brings the user back to the main screen without any further action.
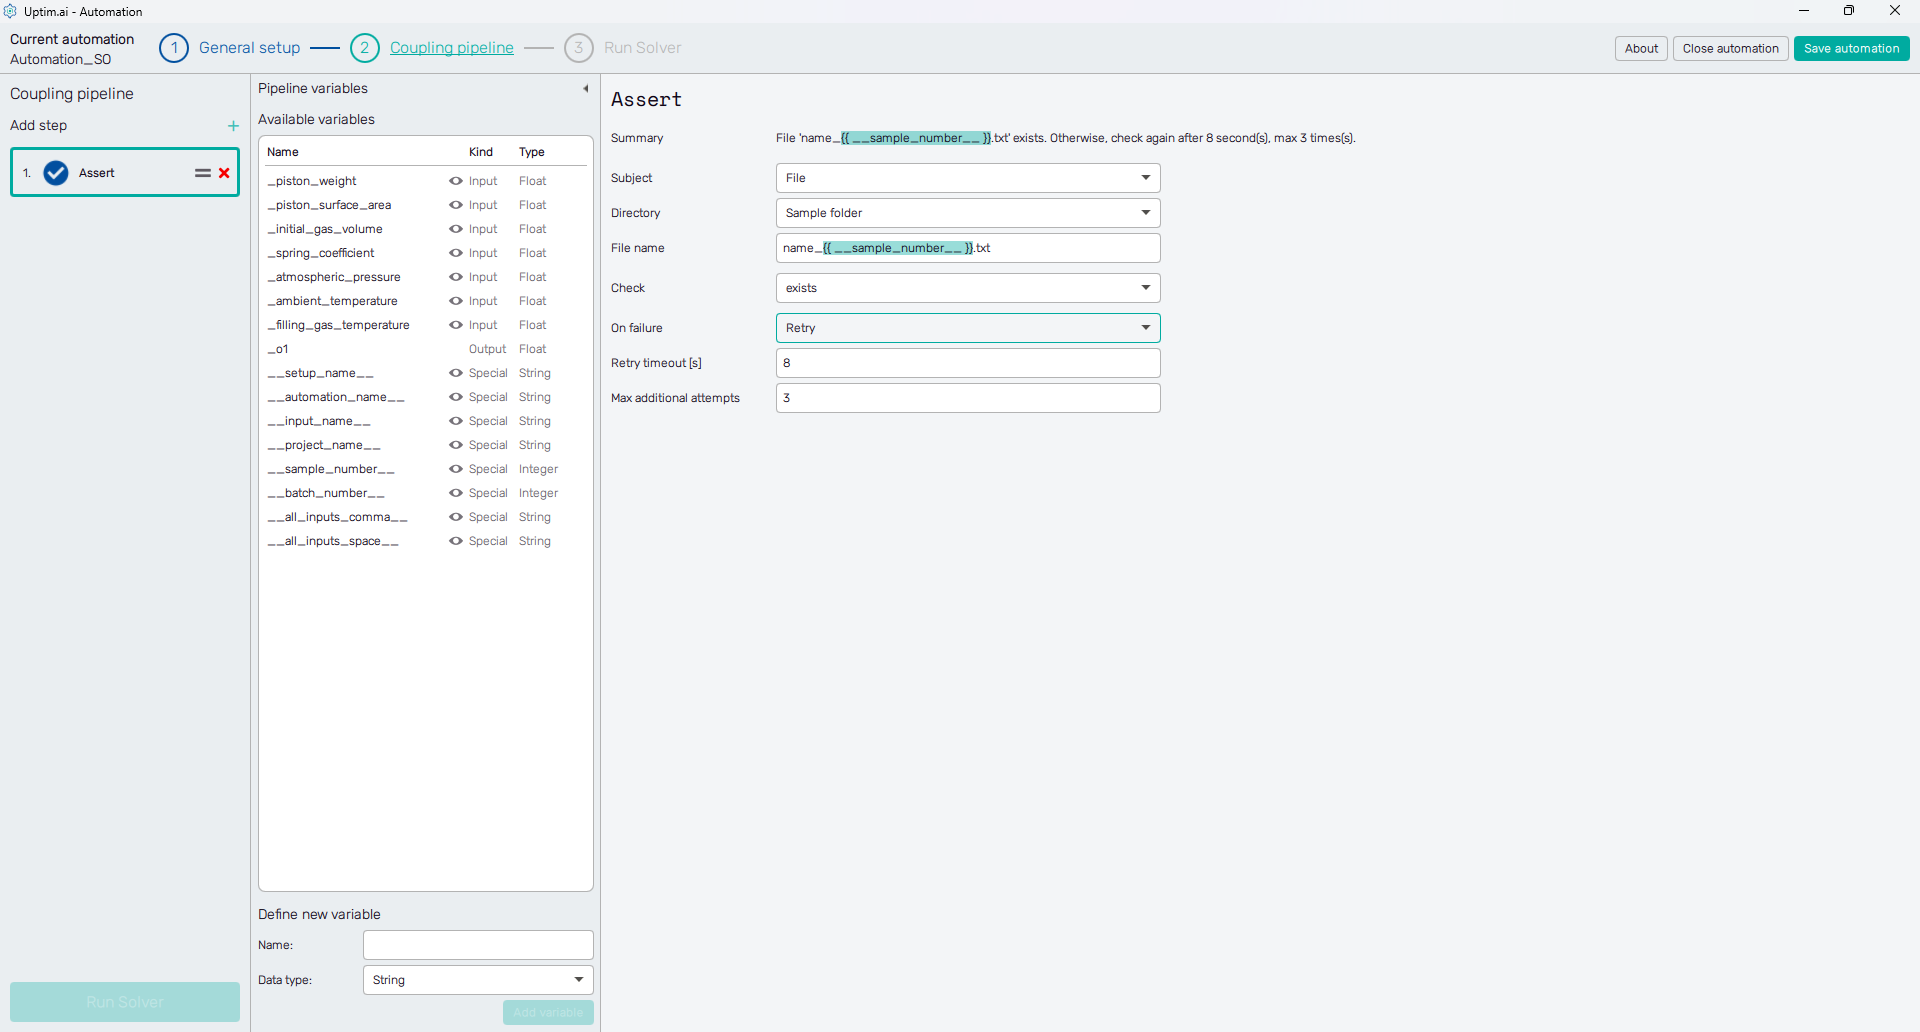
Assert
The Assert step provides various checks on files or variables when the coupling pipeline is being processed. Available options may vary based on the selected Subject of testing (file or variable). Also, certain types of checks will require additional arguments, such as ranges of values, etc.
Variable assert
The variable selected as a subject of assertion is selected from the list of Available variables. Assert options may vary based on the type of the selected variable (string, float, integer, boolean). Also, certain types of checks will require additional arguments, such as ranges of values, etc. Checks available for variable assert are:
- is set (string, float, int, bool)
- is not set (string, float, int, bool)
- is finite (float, int)
- is not finite (float, int)
- is equal to (string, float, int, bool)
- is not equal to (string, float, int, bool)
- contains (string)
- doesn’t contain (string)
- starts with (string)
- doesn’t start with (string)
- ends with (string)
- doesn’t end with (string)
- is empty (string)
- is not empty (string)
- is whitespace (string)
- is not whitespace (string)
- matches regex (string)
- doesn’t match regex (string)
- is less than (float, int)
- is less than or equal to (float, int)
- is greater than (float, int)
- is greater than or equal to (float, int)
- is within range (float, int - can also include lower and/or upper bound)
- is outside range (float, int - can also include lower and/or upper bound)
In case the variable assertion fails, the On failure selector orders either to fail (stop) the whole pipeline or to replace the variable value with a default one (mutable variables only).
File assert
The assert actions on a file, of course, require defining its name and path, which is similar to the path definition of all other step types. Checks available for file assert are:
- exists
- doesn’t exist
- is empty
- is not empty
- contains, doesn’t contain
- starts with
- doesn’t start with
- ends with
- doesn’t end with
- matches regex
- doesn’t match regex
Applying different checks than testing the condition of exists or doesn’t exist on files other than directly readable text files will always be evaluated as a failure.
In case the file assertion fails, the On failure selector orders either to fail (stop) the whole pipeline or to retry the assert action. Users can set the number of Max additional attempts to assert and the Retry timeout (in seconds) between attempts.
Copy files
Sometimes, certain files need to be copied to a different location, e.g. to (or from) the current working directory used in the coupling pipeline.

The user has to define the Source directory and the Target directory where the file will be searched for and where the modified file will be stored later. The Sample folder option is available only if the Isolate coupling files is on in the General setup of the automation session. Also, besides this and the Project folder, there is also to locate the Custom directory in a dedicated field that appears once this option is selected.
One source-target path can be set for one Copy files action, however, multiple files can be copied in this one step. Each click of the + Add file button adds a new line to the Files to copy list. Of course, these can be removed as well, with the x icon on the right.
The Source name identifies the file to be copied. Clicking the ▼ symbol in the entry field shows the list of files already available in the Source directory. The selected name can be edited eventually. The Target name field is active only if the Keep name switch is off.
Delete files
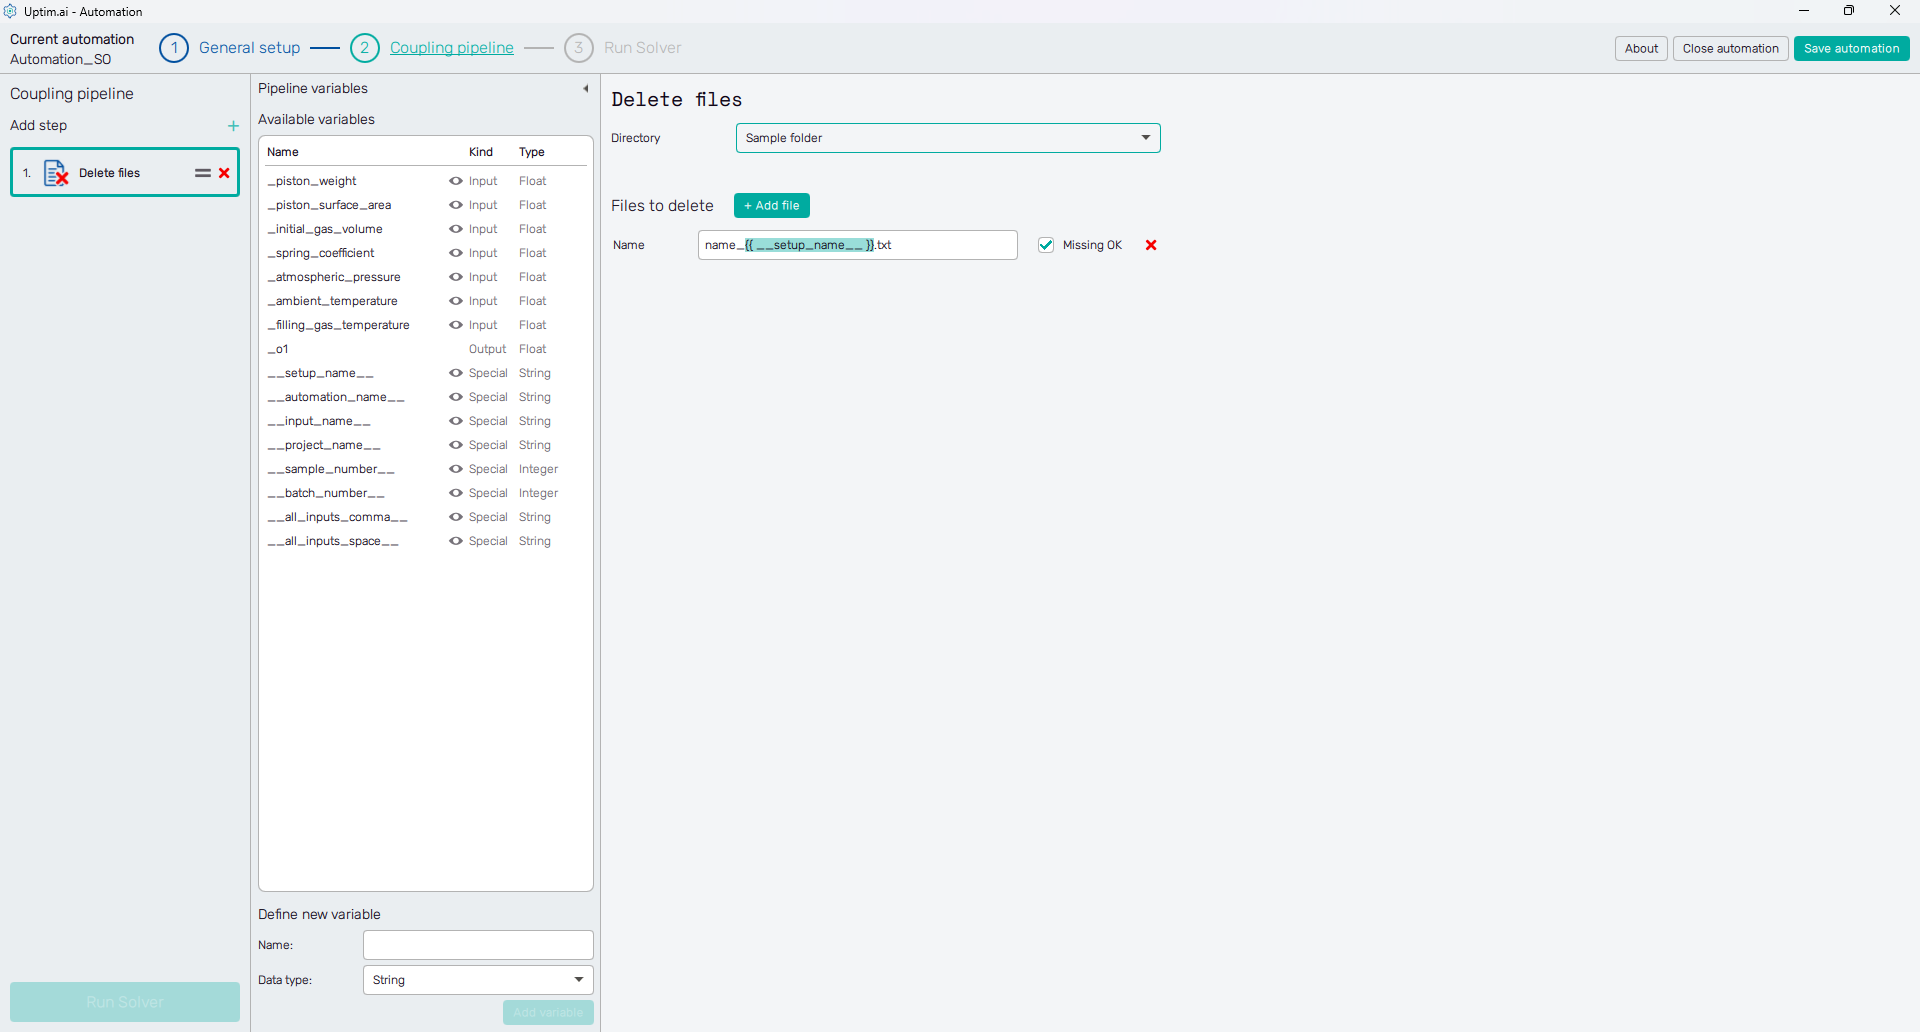
Files can be removed in a batch from one selected folder in one step. The definition of paths where files to be deleted are located. The main principle is identical to the Copy files step. In one pipeline step, files are deleted from one directory from which multiple files can be deleted in this one step. Each click of the + Add file button adds a new line to the Files to delete list. These can be removed as well, with the x icon on the right.